where to hold the exhibition?
Media department
How it might look?
On presentation boards
Who to invite?
Media students
Titles for the photos?
turning up the bass
take a break time
power up time
do my ears look big in these
Health and safety?
bags and coats on the floor
tape and wires down
make sure the presentation boards are secure.
Thursday 27 January 2011
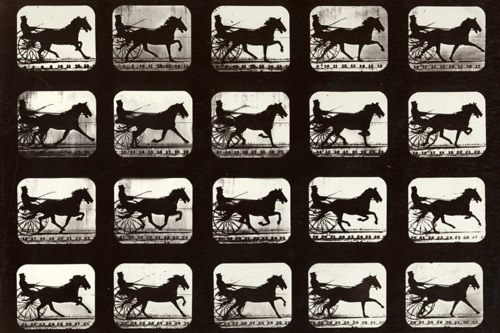
Muybridge's Motion Studies
Can you find Image evidence of the techniques?
When was it first discovered and by whom?
Edward James Muggeridge in 1867
What is special about the technique?
Muybridge managed to capture time itself in a way which had been oblivious to anyone else.
How does this technique work? Can you find or describe the processes needed to make it work? Maybe illustrate how it is made.
muybridge placed 24 cameras in a line with electric shutters which went off every four seconds.
Can you comment how important this technique has been for the history of photography. For example was it popular and is it still used today?
the technique isn't used as much any more just to teach students of the technique.
The Camera Obscura
Can you find Image evidence of the techniques?

When was it first discovered and by whom?
it is hard to say who discovered it and by when as it was so far back it is hard for people to get the accounts correct.
What is special about the technique?
it started the world of photography but upside down
How does this technique work? Can you find or describe the processes needed to make it work? Maybe illustrate how it is made. Acamera obscura can be made by using a dark room and cuting a small hole on a wall with a window and the image will appear on the opposite wall upside down.

(1) A camera obscura that you can sit or stand in A simple camera obscura can be made from a large box (e.g., an appliance box).
A hole of about 1" diameter needs to be made on one side.
A way for a person to get into the camera should be devised: a door, or through the bottom. Make sure that the door can close.
The trick is to let light in only through the pinhole--else the inside of the camera will not be dark enough to see the image. Covering the box with a blanket will help keep out extraneous light rays. The camera obscura at Davis works best if it is used with two blankets: one that covers all but the pinhole side and a folded one on the ground that the camera sits on top of, so that light rays don't get in from where it touches the ground and where we get in.
Put a piece of white paper opposite the pinhole. This paper can be changed with each student so that they can draw what they see while inside the box. It's fun to draw a friend.
(2) A small camera obscura
Students can make their own small camera obscura using a small box and a magnifying glass. The glass bends the rays and makes them meet (or focus) on tracing paper to form an image. The process is as follows:
Materials:
a small plastic magnifying glass
a small box
poster board
tracing paper
electrician's tape
strong glue
acrylic or poster paints (including black)
scissors, pencil, paintbrush,ruler, exacto knife, saucer, jar of water
Process:
Paint the inside of the box black and let it dry
Cut a large rectangle out of one side of the box (e.g. 2 1/2-3" high by 4" long), opposite where you will put the lens
Cut out a 4" x 8" rectangle of poster board. Roll and tape it into a tube that is the diameter of the magnifying glass
Hold the tube on the side of the box that is opposite the large rectangular hole and trace around it with a pencil. Cut out the circle.
Measure and cut a piece of tracing paper to fit over the rectangular hole in the box. Tape the tracing paper over the hole.
Tape the magnifying glass to one end of the tube
Slide the end of the tube without the magnifying glass on it into the circular hole in the box
Tape around all the edges of the box to prevent light from getting in (don't tape the tube to the box though)
Using the camera obscura:
Point the magnifying glass toward an object that is in bright light. You will see it, upside down, through the tracing paper on the back of the camera. Push the tube in or out of the box to focus it. The magnifyng glass acts as a lens; this image should be much sharper than the one created by the large camera obscura described above.
http://www.cfa.arizona.edu/are476/Davis/files/CamObs.htm
Can you comment how important this technique has been for the history of photography. For example was it popular and is it still used today?
it is still used today but to show students how photography started.
Thursday 20 January 2011
Dagerreotype
Can you find Image evidence of the technique?
When was it first discovered and by whom?
Details of the process were made public on 19 August 1839, and Daguerre named it the Daguerreotype.
What is special about the technique?
you can only make one copy of the picture and it goes through and bounces back causes the image to be shown uside down
How does this technique work? Can you find or describe the processes needed to make it work? Maybe illustrate how it is made.
the daguerreotype method is an image which is exposed directly onto a copper sheet that's been covered with a mirror-smooth surface of silver which has in turn been coated with silver halide particles. The silver is sensitized with iodine, exposed, and then developed in mercury.
Step 1. Start with a silver-plated piece of copper and polish it to as close to a mirror finish as possible. Most daguerreotypists use a bench grinder outfitted with a polishing wheel to prepare their plates.
Step 2. The next step is to "sensitize" the plate. Place the plate into a sealed box containing a shallow tub filled with iodine crystals. After a few minutes of exposure to the iodine vapors, your silver plate should take on a purplish hue. Most "dag artists" use specially-constructed coating boxes with a sliding element at the top, allowing them to slide a plate into the vapor-filled box, then slide it out without touching the plate or exposing themselves to the vapors. Iodine vapors are extremely harmful and dangerous to work with, so precautions such as ventilators and respirators are a must.
Step 3. Mount the sensitized plate onto your camera's film holder and seal the camera.
Step 4. Pick a well-lit, stationary subject to capture. Choose something as close to totally stationary as possible, as exposure can take between 1 and 7 minutes depending on the light. Obviously, bright sunlight works best.
Step 5. In a darkroom, remove your exposed plate and tape a sheet of Amberlith film on top of it. Seal the edges with light-proof tape (both can be purchased at an art supply or photo supply store) and place it in the sun for two hours. This will develop your image, and you should start seeing results within the first 30 minutes or so. This is actually different than Louis Daguerre's original method -- he used mercury vapors to develop the image. This method is much easier, safer and less expensive.
Step 6. Now it's time to wash your plate. Mix up a Hypo clearing agent in a developing tray place the plate into the solution-filled tray. Don't let any bubbles form on the surface of the plate when you're getting it wet, otherwise your image will be ruined. Once the plate is fully submerged, gently stir the solution until your image shows on the plate as clear black and white. Follow with a water bath (using the same care in immersion) to wash away any remaining silver halide particles.
Step 7. At this point, your image is just dust on a silver plate. Touching it, brushing against it, or dropping water directly onto it will ruin it. Quickly preserve it by mounting it behind a piece of glass in a specially-constructed daguerreotype holder. You can buy an antique holder, make your own, or have one constructed by a frame shop.
 http://howto.wired.com/wiki/Make_a_Daguerreotype
Can you comment how important this technique has been for the history of photography. For example was it popular and is it still used today?
it is still used today but mostly by specialist, the dagerroetype has changed the look of photography and has enabled it to progress but it didn't last long as you could only get one copy of the photo and no extra's

When was it first discovered and by whom?
Details of the process were made public on 19 August 1839, and Daguerre named it the Daguerreotype.
What is special about the technique?
you can only make one copy of the picture and it goes through and bounces back causes the image to be shown uside down
How does this technique work? Can you find or describe the processes needed to make it work? Maybe illustrate how it is made.
the daguerreotype method is an image which is exposed directly onto a copper sheet that's been covered with a mirror-smooth surface of silver which has in turn been coated with silver halide particles. The silver is sensitized with iodine, exposed, and then developed in mercury.
Step 1. Start with a silver-plated piece of copper and polish it to as close to a mirror finish as possible. Most daguerreotypists use a bench grinder outfitted with a polishing wheel to prepare their plates.
Step 2. The next step is to "sensitize" the plate. Place the plate into a sealed box containing a shallow tub filled with iodine crystals. After a few minutes of exposure to the iodine vapors, your silver plate should take on a purplish hue. Most "dag artists" use specially-constructed coating boxes with a sliding element at the top, allowing them to slide a plate into the vapor-filled box, then slide it out without touching the plate or exposing themselves to the vapors. Iodine vapors are extremely harmful and dangerous to work with, so precautions such as ventilators and respirators are a must.
Step 3. Mount the sensitized plate onto your camera's film holder and seal the camera.
Step 4. Pick a well-lit, stationary subject to capture. Choose something as close to totally stationary as possible, as exposure can take between 1 and 7 minutes depending on the light. Obviously, bright sunlight works best.
Step 5. In a darkroom, remove your exposed plate and tape a sheet of Amberlith film on top of it. Seal the edges with light-proof tape (both can be purchased at an art supply or photo supply store) and place it in the sun for two hours. This will develop your image, and you should start seeing results within the first 30 minutes or so. This is actually different than Louis Daguerre's original method -- he used mercury vapors to develop the image. This method is much easier, safer and less expensive.
Step 6. Now it's time to wash your plate. Mix up a Hypo clearing agent in a developing tray place the plate into the solution-filled tray. Don't let any bubbles form on the surface of the plate when you're getting it wet, otherwise your image will be ruined. Once the plate is fully submerged, gently stir the solution until your image shows on the plate as clear black and white. Follow with a water bath (using the same care in immersion) to wash away any remaining silver halide particles.
Step 7. At this point, your image is just dust on a silver plate. Touching it, brushing against it, or dropping water directly onto it will ruin it. Quickly preserve it by mounting it behind a piece of glass in a specially-constructed daguerreotype holder. You can buy an antique holder, make your own, or have one constructed by a frame shop.

Can you comment how important this technique has been for the history of photography. For example was it popular and is it still used today?
it is still used today but mostly by specialist, the dagerroetype has changed the look of photography and has enabled it to progress but it didn't last long as you could only get one copy of the photo and no extra's
Subscribe to:
Posts (Atom)